Golf Course
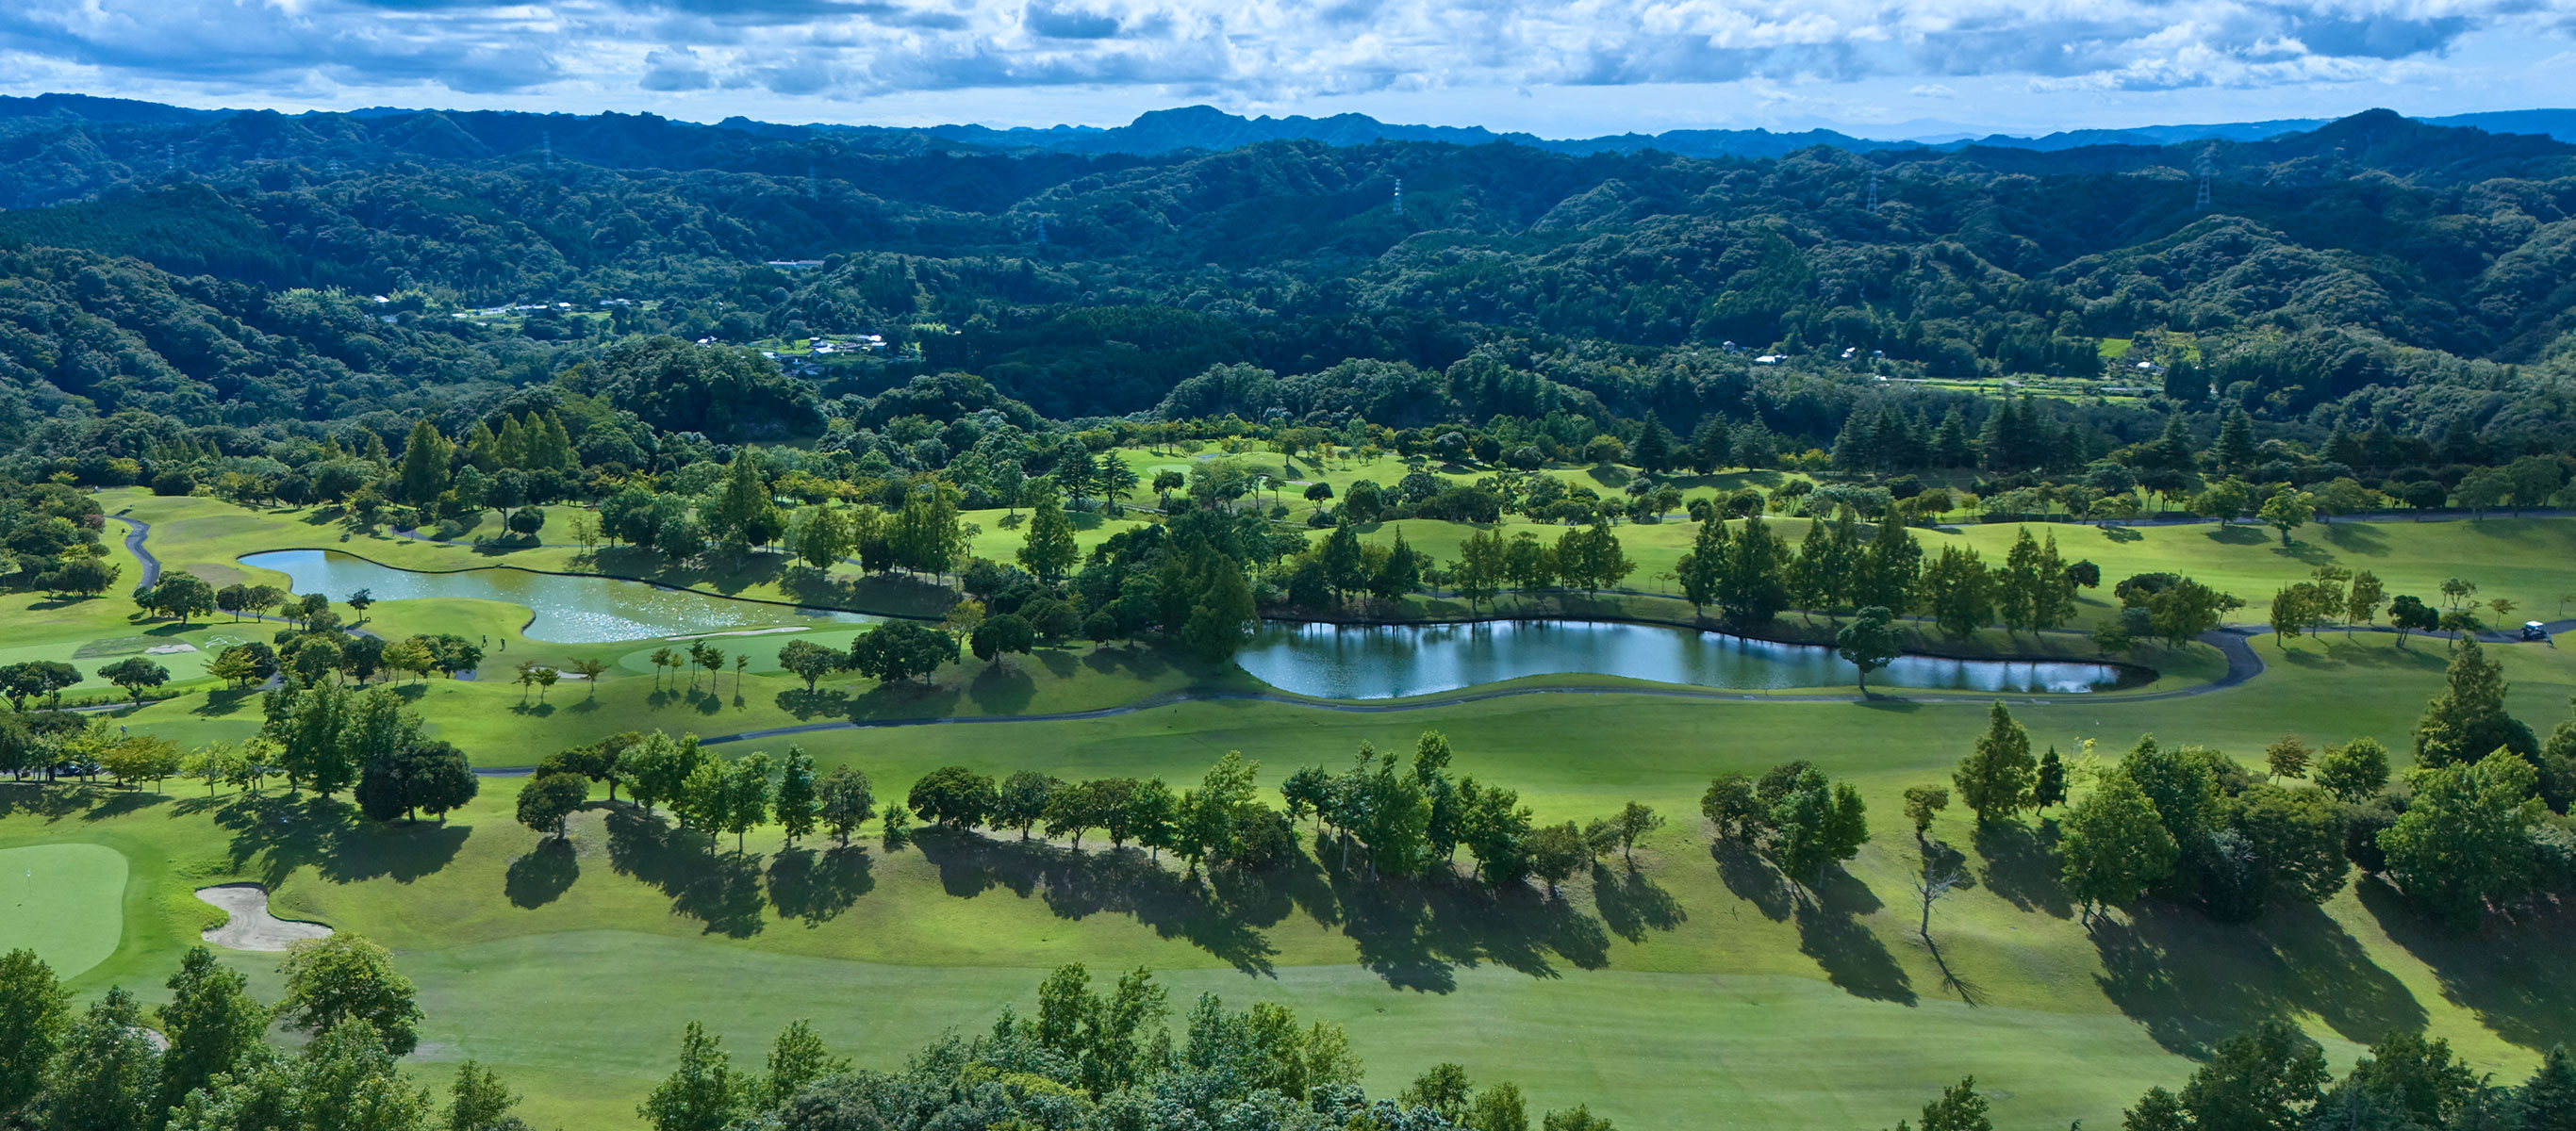
The shimmer of the lake and the ridgeline of the sky unfold,
revealing eighteen holes of crystalline clarity.
The sparkle of the lake’s surface, the wind crossing the mountain ridges, the distant outline of Mount Fuji rising on a clear day—
together, they lend a lucid contour to the air of this land.
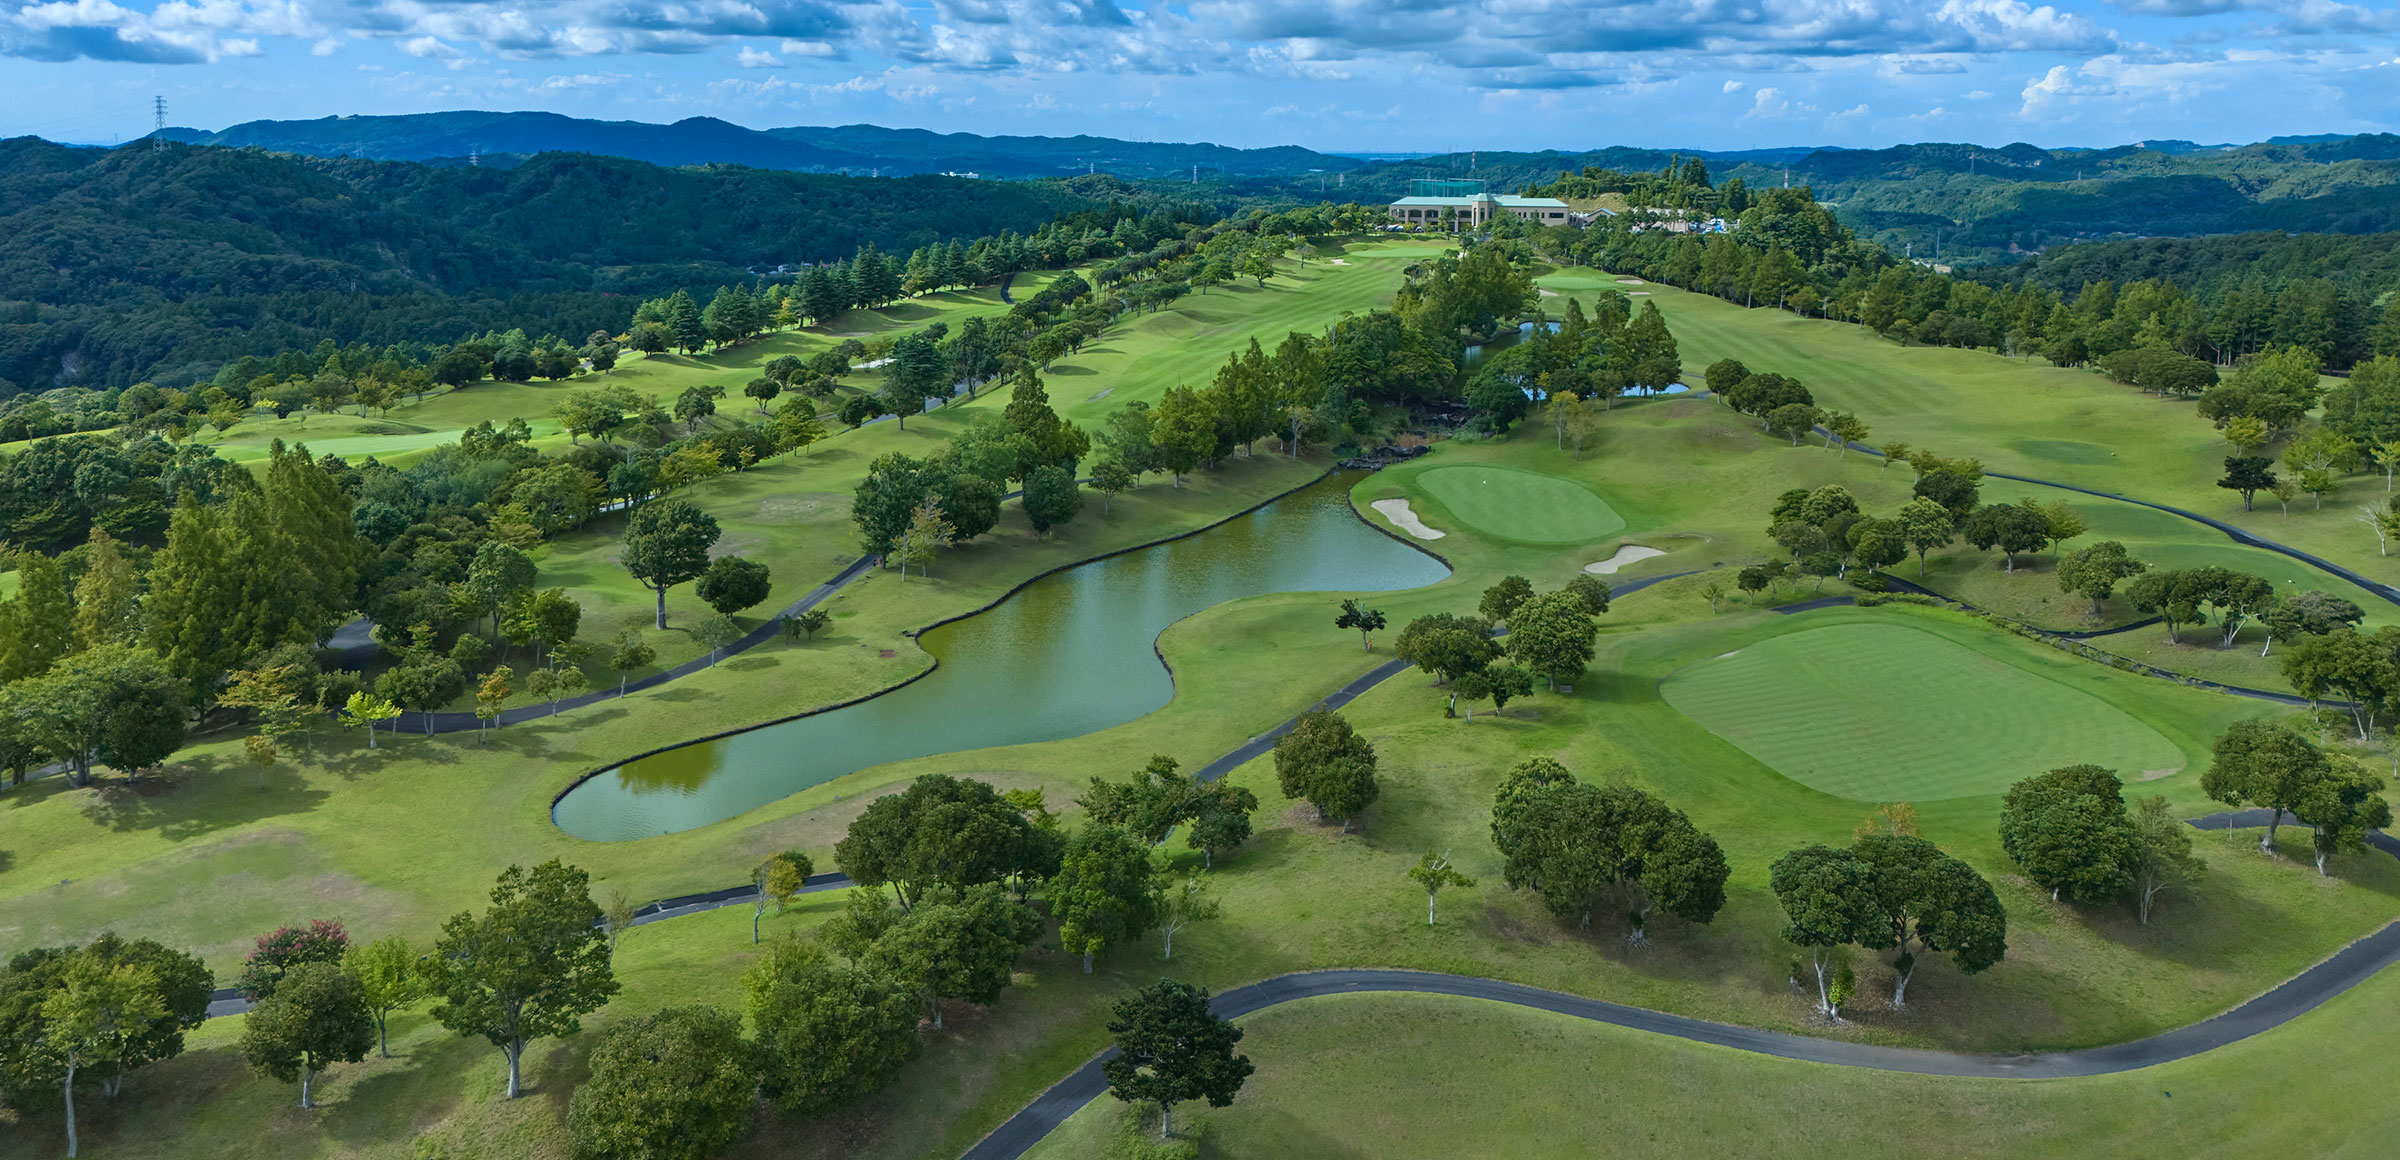
Standing on the tee ground, the view opens broadly toward the sky, and the trajectory of a struck white ball is drawn into the heights of blue.
With most holes designed to extend the line of sight straight toward the pin,
the layout resonates with the land’s pure and open landscape, guiding the hand toward a confident, unrestrained stroke.
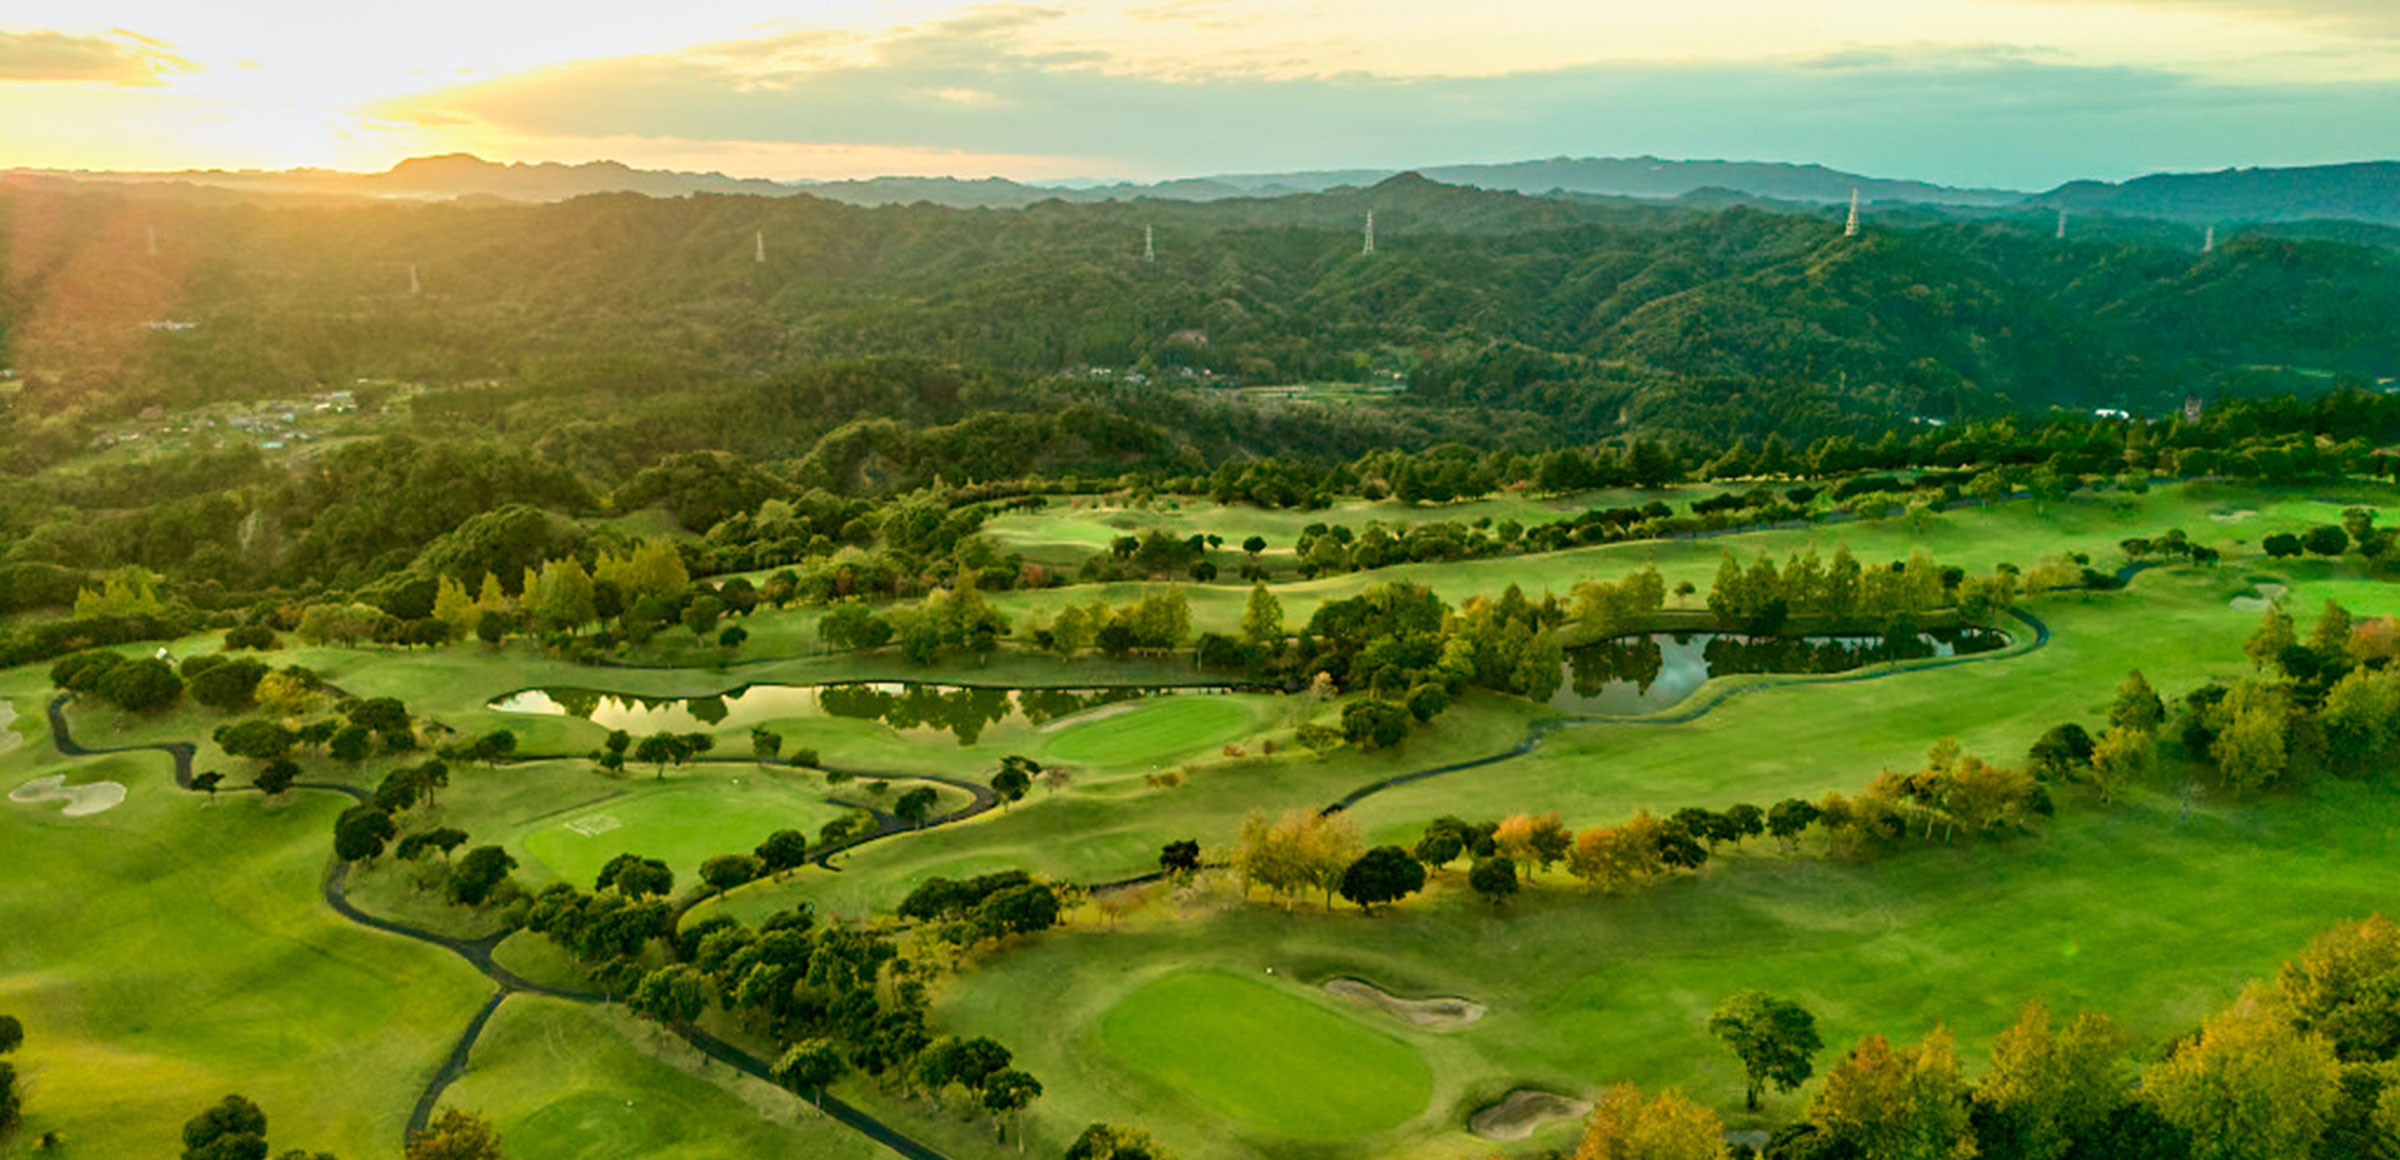
Yet beneath one’s feet, subtle undulations continue in quiet succession, and the faint presence of wind gently alters the ball’s path, testing the depth of one’s judgment.
In contrast to the soft light of the scenery, a meticulous intention breathes within the structure of the course,
its precision giving heightened meaning to every swing.
What unfolds here are eighteen holes where lake light, sky, wind, and earth intersect—
sharpening the senses of every player who steps upon them.
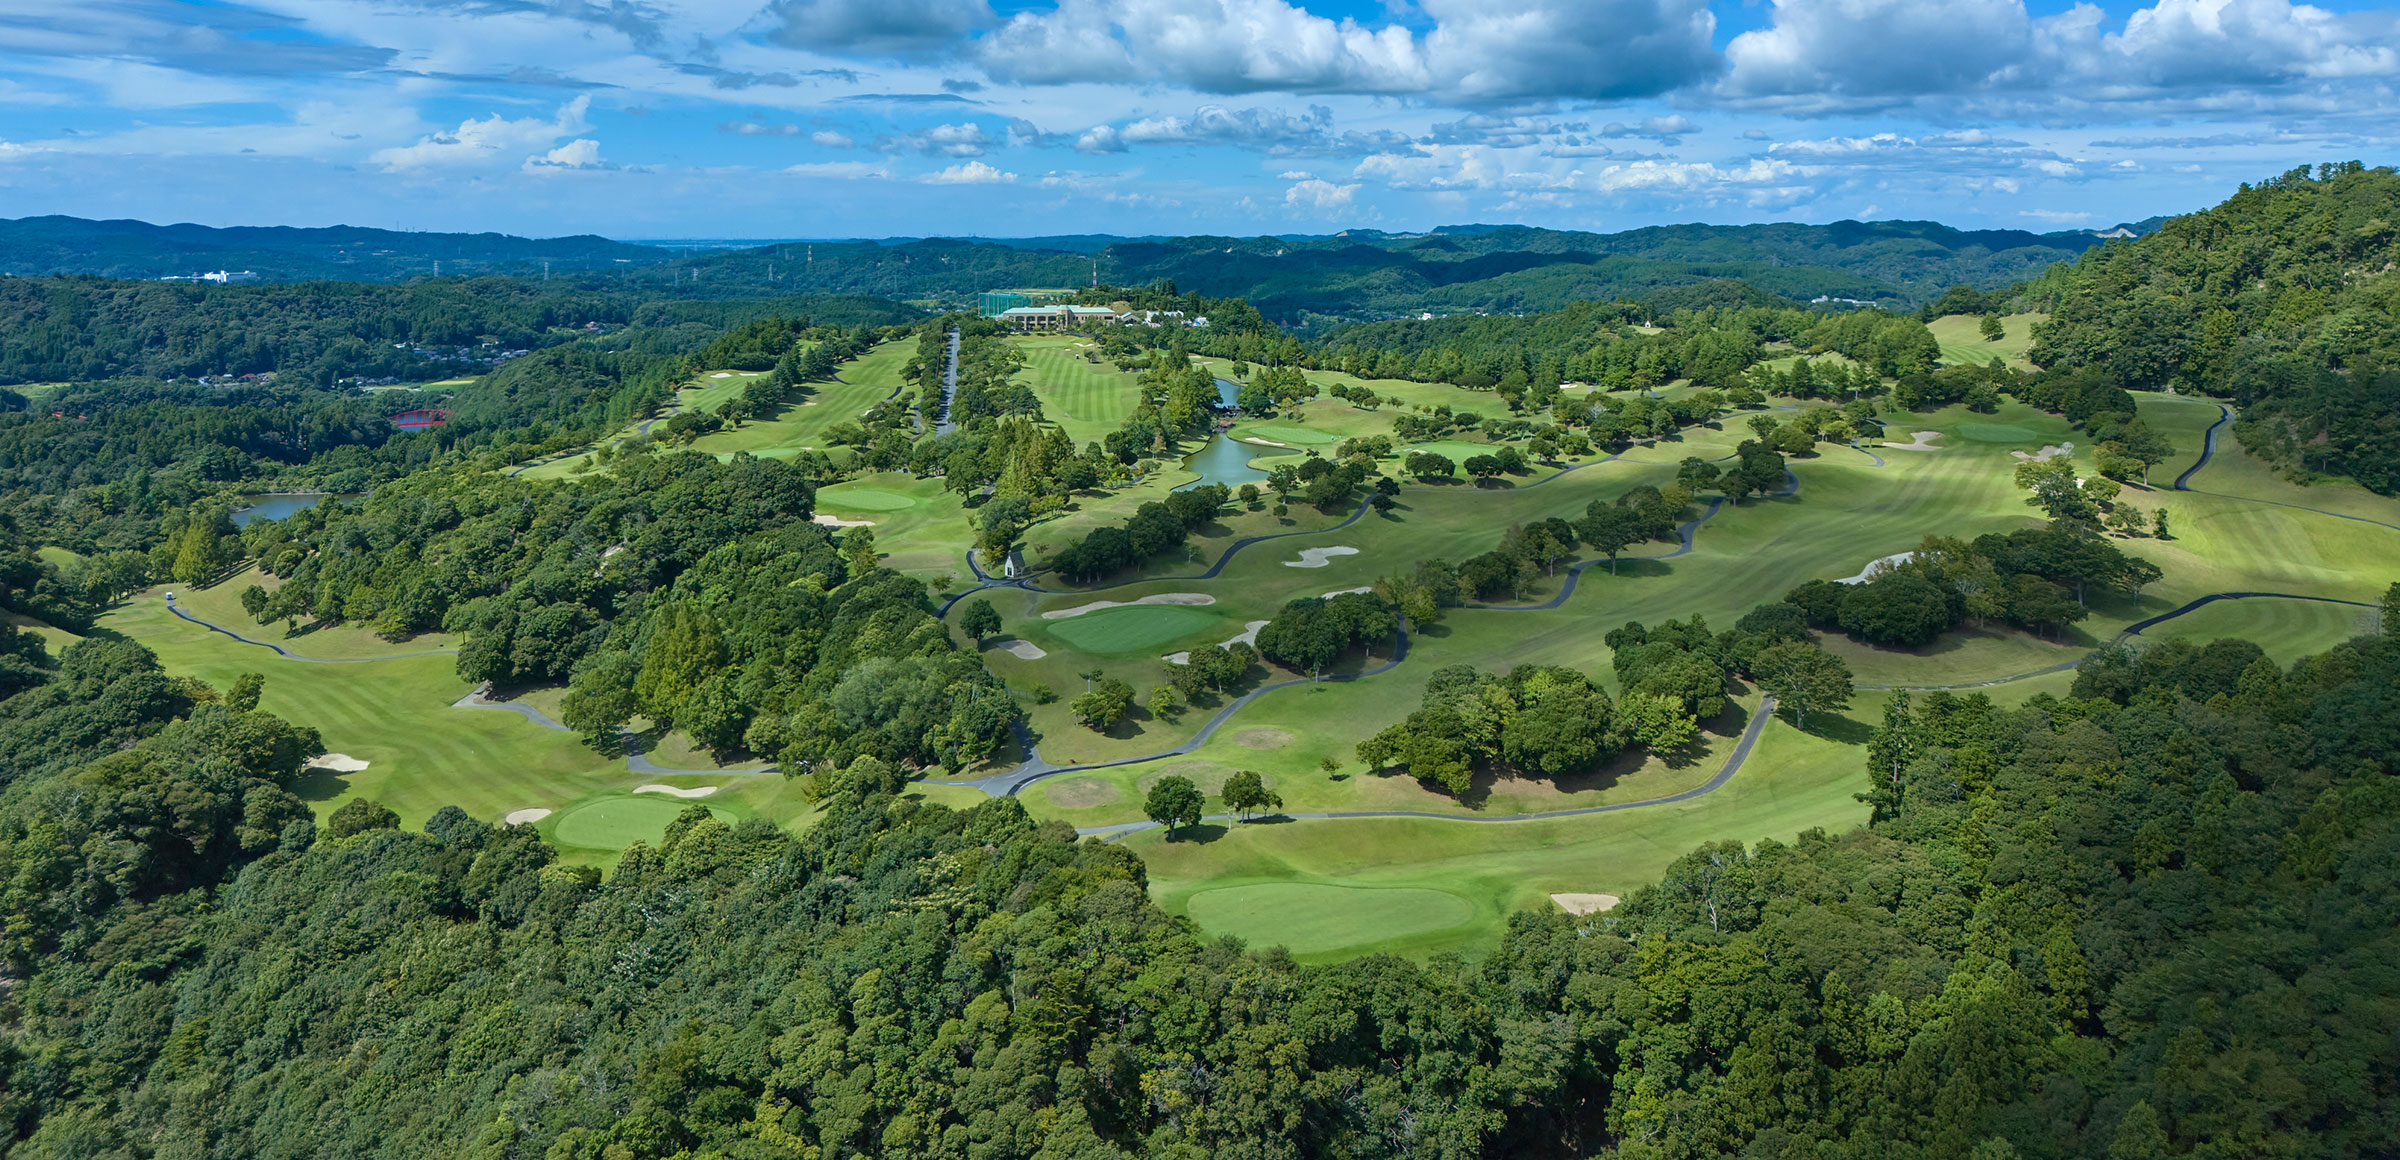
Course Layout
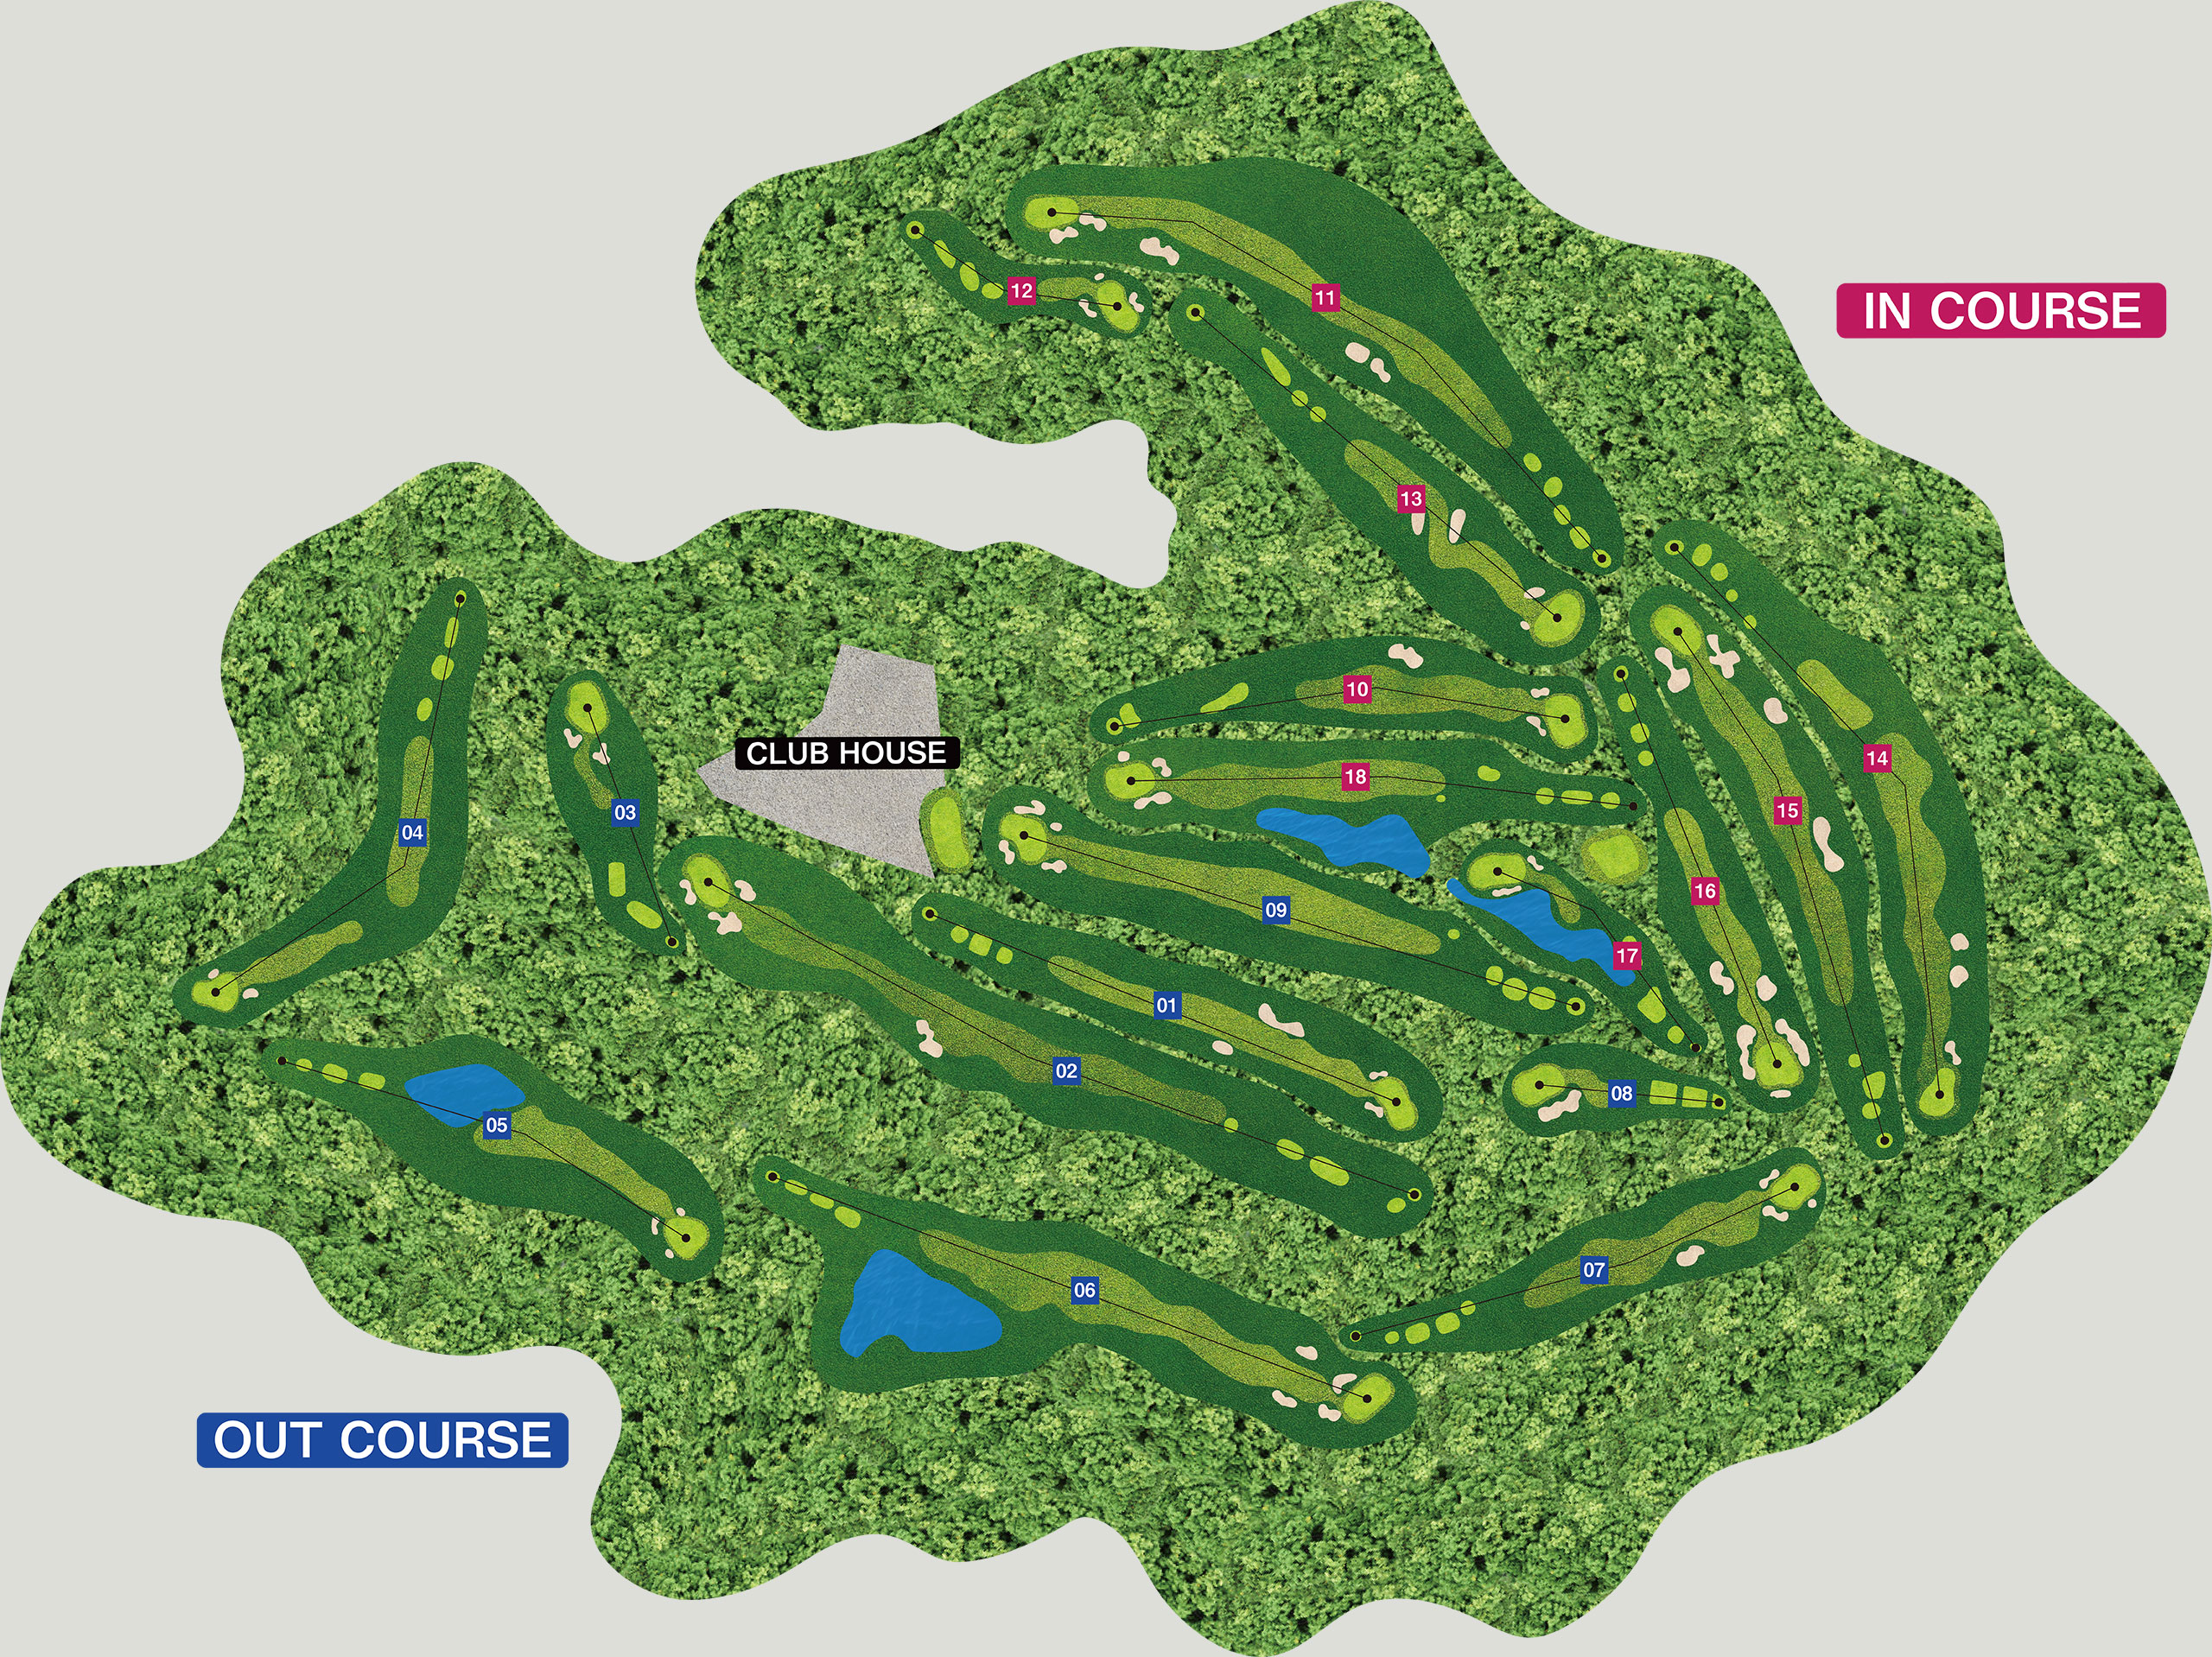
Out Course
-
HOLE 1PAR 4
- BLUE
- 418y
- WHITE
- 387y
- GREEN
- 367y
- RED
- 346y
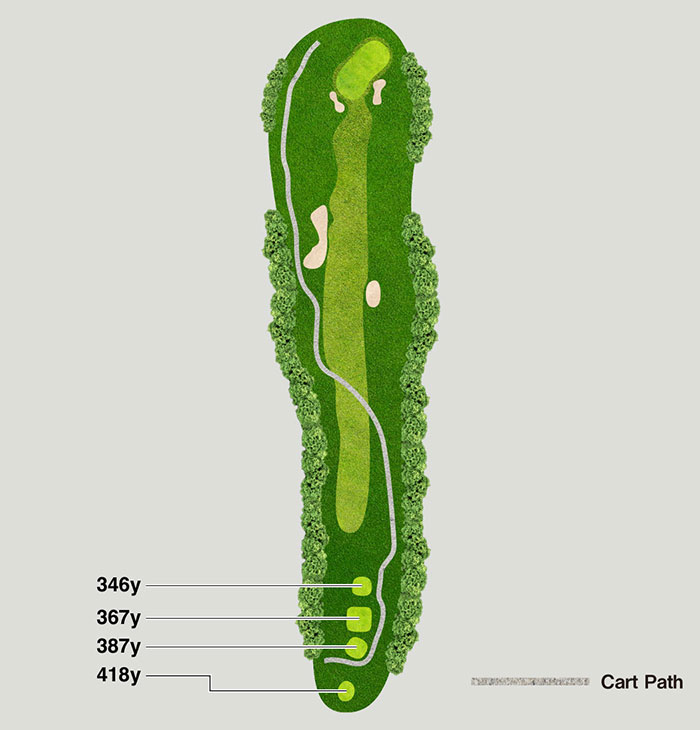
A gently downhill middle hole. Beware of the right-side penalty area and aim left. For the second shot, avoid the deep bunker on the right and play safely in from the left side.
-
HOLE 2PAR 5
- BLUE
- 593y
- WHITE
- 583y
- GREEN
- 526y
- RED
- 437y
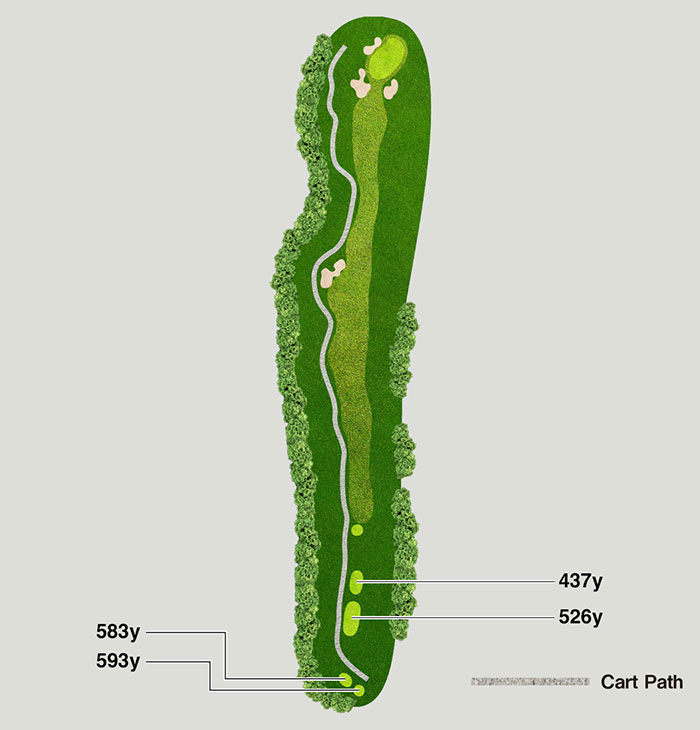
A long par five with considerable distance. Aim your tee shot toward the right edge. The second shot is narrow and requires caution. Use a slightly longer club to carry onto the elevated green.
-
HOLE 3PAR 3
- BLUE
- 190y
- WHITE
- 162y
- GREEN
- 157y
- RED
- 126y
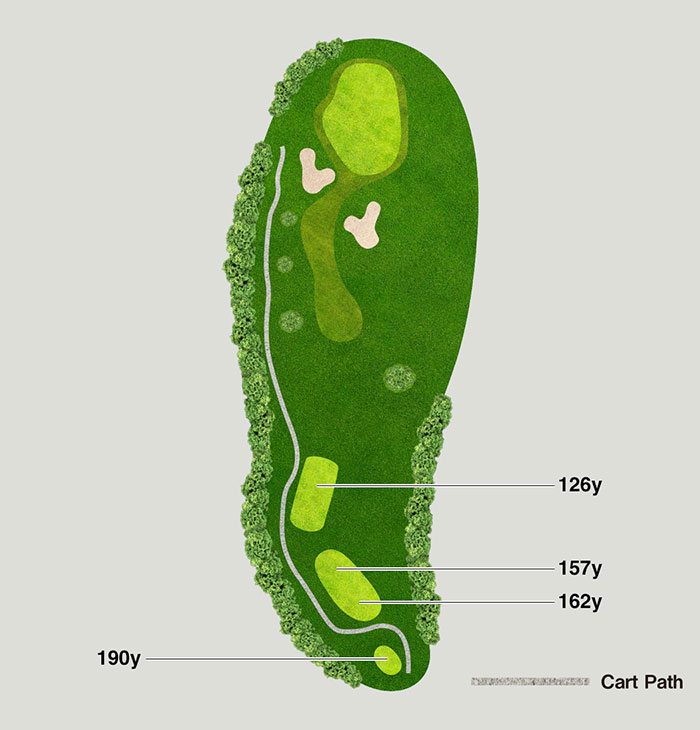
A hole where the back right of the green slopes away. The basic strategy is to aim for the center. An approach route from the back right is also effective.
-
HOLE 4PAR 4
- BLUE
- 437y
- WHITE
- 407y
- GREEN
- 379y
- RED
- 342y
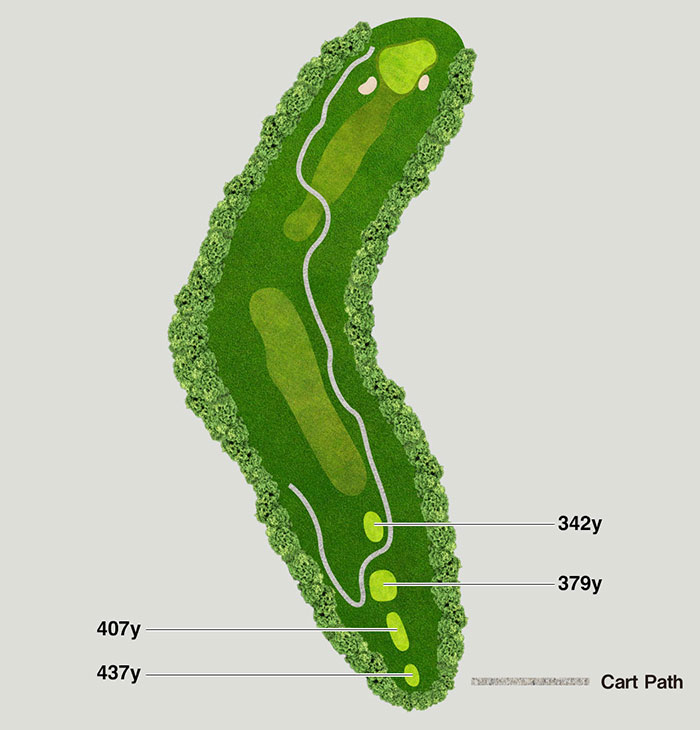
A right dogleg par-4. The tee shot is key. Long hitters may attempt to cut the corner on the right, but it is quite challenging.
-
HOLE 5PAR 4
- BLUE
- 361y
- WHITE
- 343y
- GREEN
- 317y
- RED
- 287y
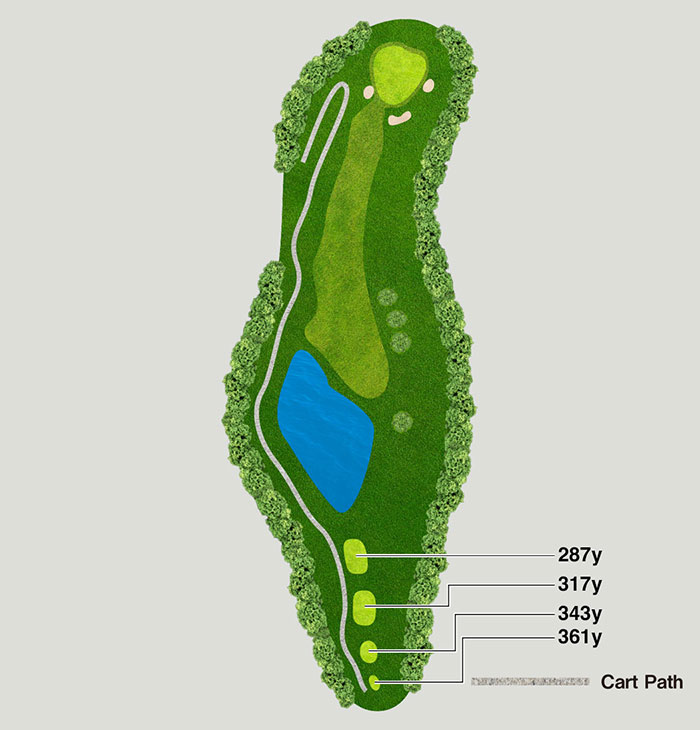
A middle hole that requires a carry over the pond. Aim for the center off the tee. On the uphill second shot, take a slightly longer club and play securely in from the left side.
-
HOLE 6PAR 5
- BLUE
- 497y
- WHITE
- 476y
- GREEN
- 454y
- RED
- 431y
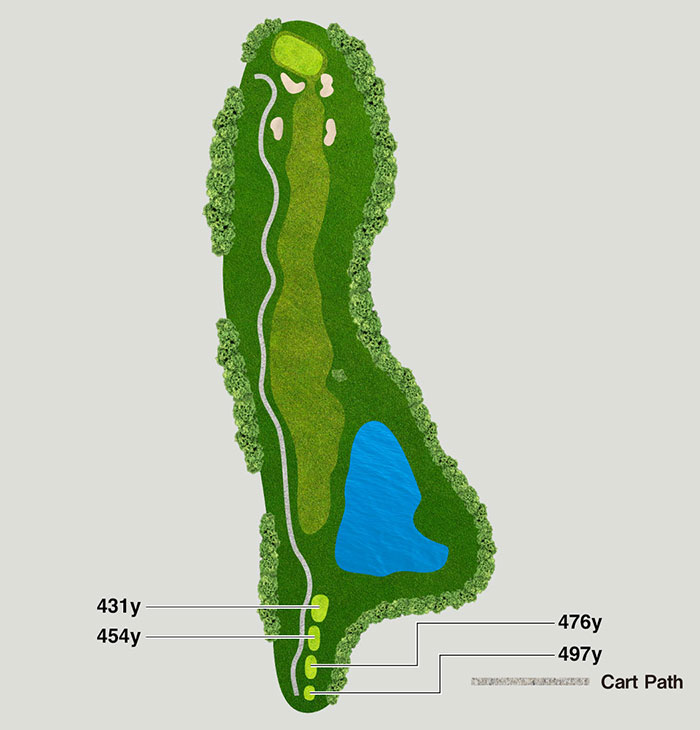
An uphill par five with a chance to reach in two. The basic target is the left side of the fairway. Avoid the deep bunkers, and if laying up, prioritize precise distance control.
-
HOLE 7PAR 4
- BLUE
- 355y
- WHITE
- 331y
- GREEN
- 309y
- RED
- 264y
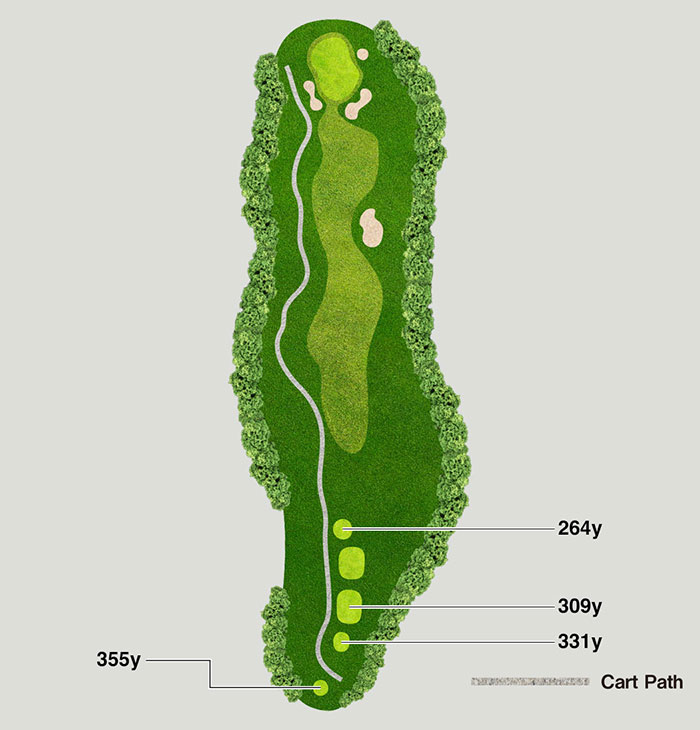
A gently uphill middle hole. The landing area is narrow, so accuracy is essential. The left side of the cross bunker is the ideal target. Use a slightly longer club to ensure you carry onto the elevated green.
-
HOLE 8PAR 3
- BLUE
- 140y
- WHITE
- 120y
- GREEN
- 115y
- RED
- 102y
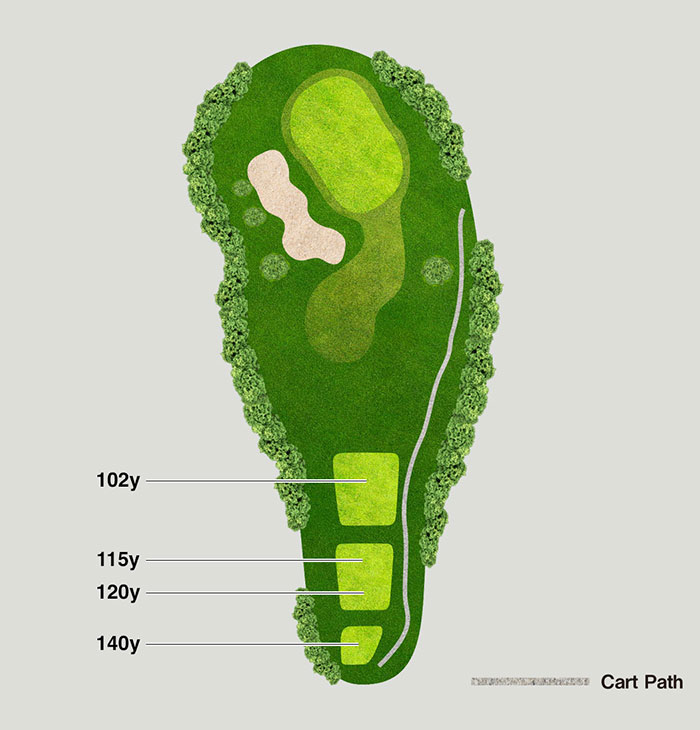
A relatively short par three. The left bunker has significant elevation changes and is challenging. An accurate shot is required, and taking one more club is recommended.
-
HOLE 9PAR 4
- BLUE
- 443y
- WHITE
- 416y
- GREEN
- 394y
- RED
- 376y
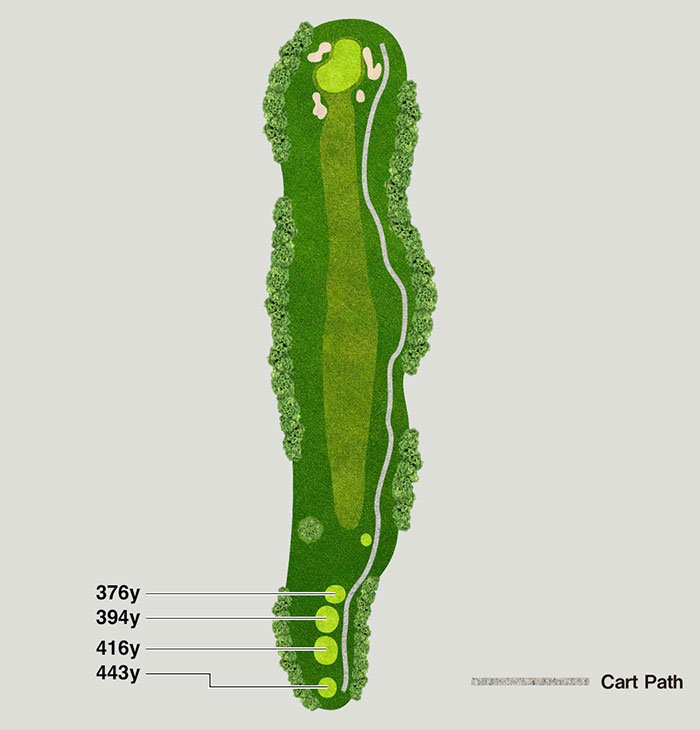
The longest middle hole on the outward nine. The fairway is wide, so take an aggressive tee shot. For the second shot, avoid the guarding bunkers and aim for the center of the green.
In Course
-
HOLE 10PAR 4
- BLUE
- 352y
- WHITE
- 336y
- GREEN
- 273y
- RED
- 253y
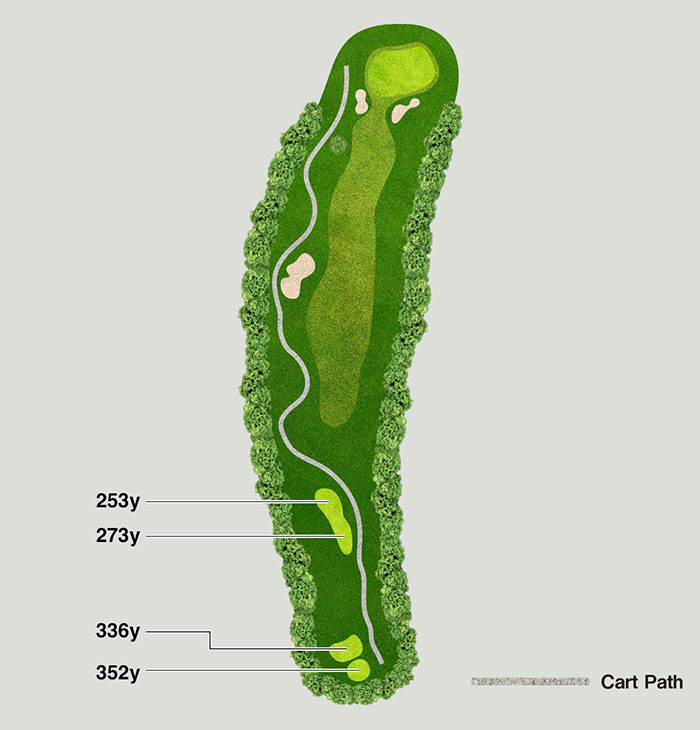
A wide fairway invites a tee shot aimed slightly to the left. For the second shot, take care to avoid the deep bunker guarding the front of the green and the mound beyond. Focus on precise distance control to set up a safe approach.
-
HOLE 11PAR 5
- BLUE
- 520y
- WHITE
- 495y
- GREEN
- 472y
- RED
- 429y
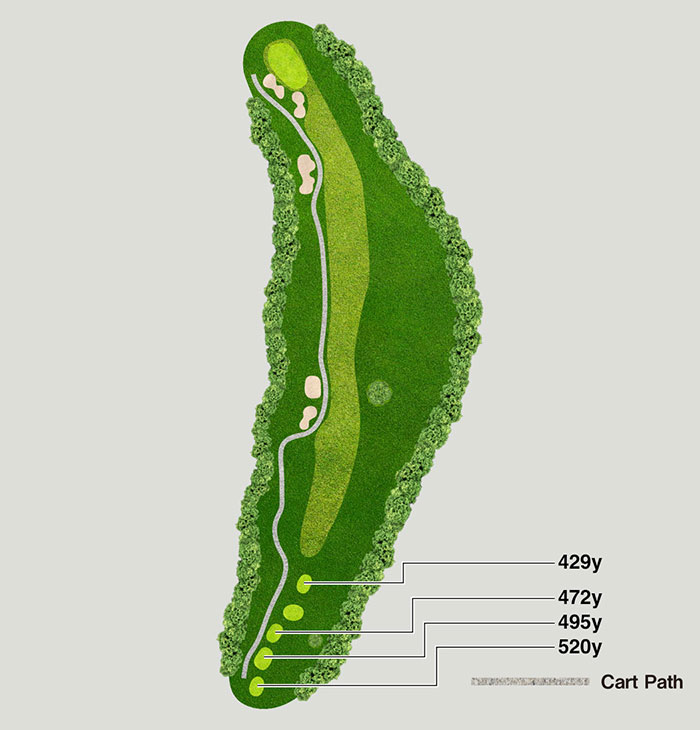
A long left dogleg hole. The safest line off the tee is toward the right foothill. From the downhill second shot onward, be mindful of the undulating terrain and control your approach carefully.
-
HOLE 12PAR 3
- BLUE
- 178y
- WHITE
- 146y
- GREEN
- 122y
- RED
- 101y
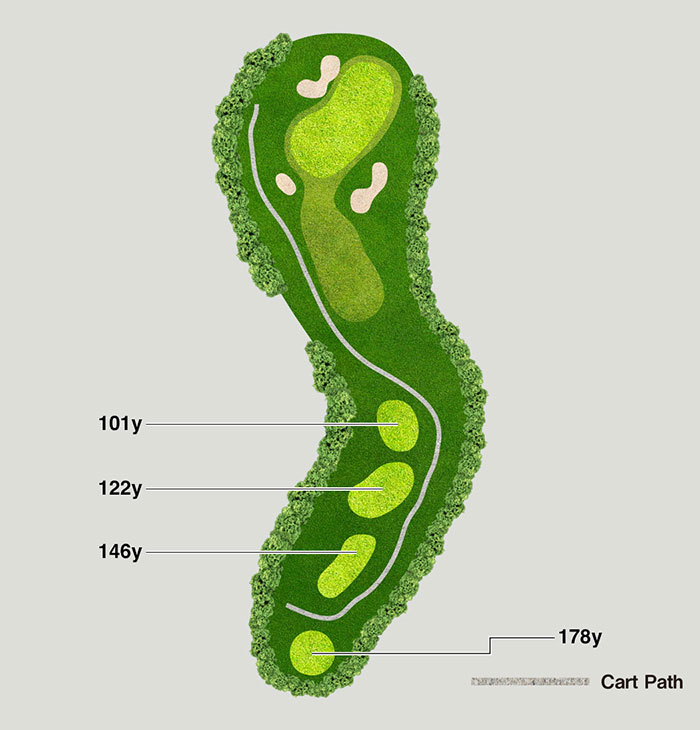
A flat short hole with a small, challenging green. Aim toward the left side, but take care to avoid the bunker at the back, as recovery from there can be difficult.
-
HOLE 13PAR 4
- BLUE
- 368y
- WHITE
- 287y
- GREEN
- 263y
- RED
- 245y
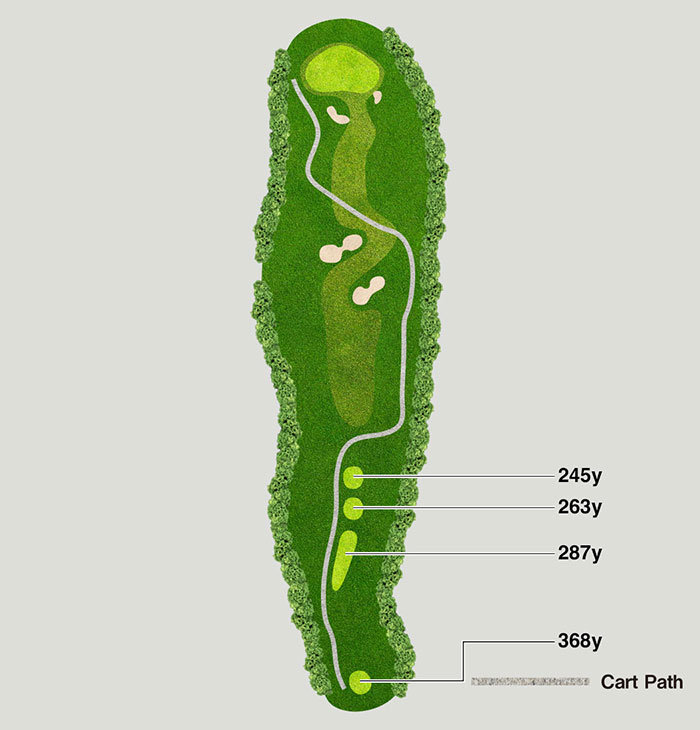
A visually striking middle hole highlighted by well-placed cross bunkers. The approach plays slightly uphill, making distance control tricky—favor a shot that lands short and runs up safely onto the green.
-
HOLE 14PAR 5
- BLUE
- 510y
- WHITE
- 492y
- GREEN
- 472y
- RED
- 430y
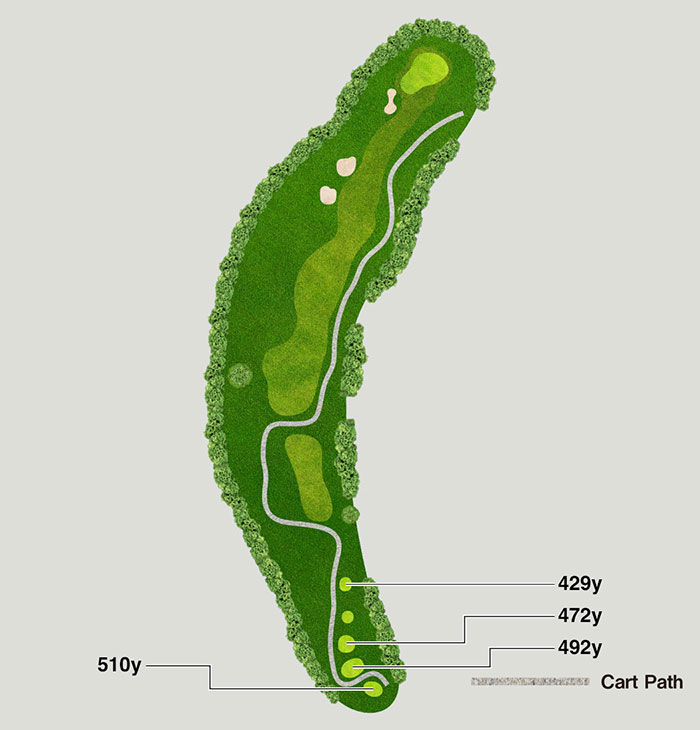
A scenic long hole framed by natural woodland along the left side. A well-placed tee shot can set up a chance to reach the green in two, but the back-left of the green is dangerous. Laying up is a smart and effective option.
-
HOLE 15PAR 4
- BLUE
- 425y
- WHITE
- 396y
- GREEN
- 380y
- RED
- 302y
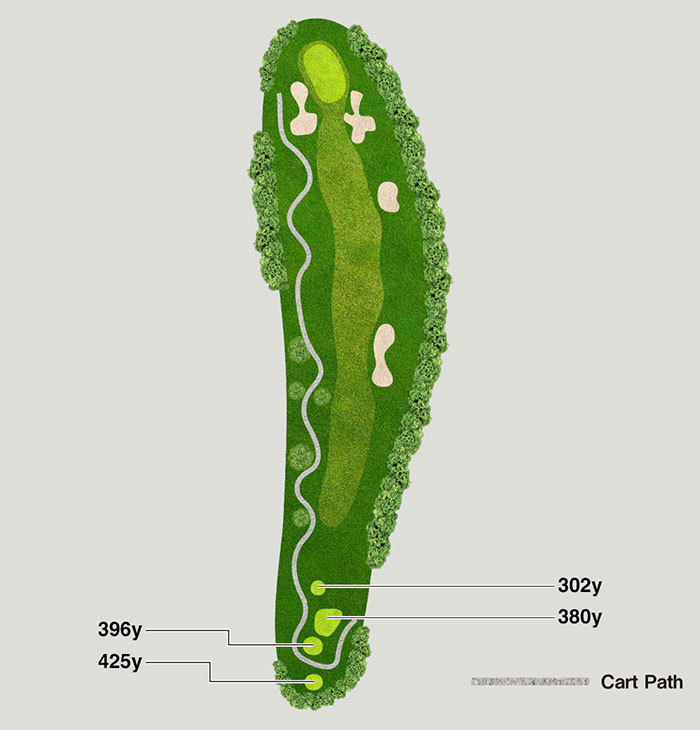
A long middle hole that plays gently uphill throughout. Both the tee shot and second require solid distance, and the long, two-tiered green is best approached via the front entrance for a controlled run-up.
-
HOLE 16PAR 4
- BLUE
- 360y
- WHITE
- 324y
- GREEN
- 301y
- RED
- 256y
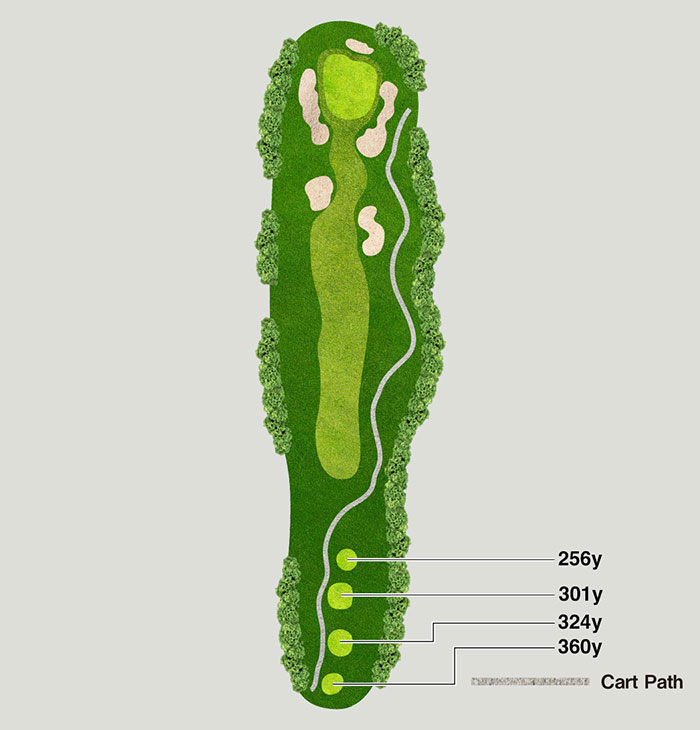
A short but demanding hole. From the tee, enjoy views of the Bōsō hills as the green appears to float ahead. Avoid the cross bunkers, and play a precise second shot to find the putting surface.
-
HOLE 17PAR 3
- BLUE
- 200y
- WHITE
- 179y
- GREEN
- 154y
- RED
- 117y
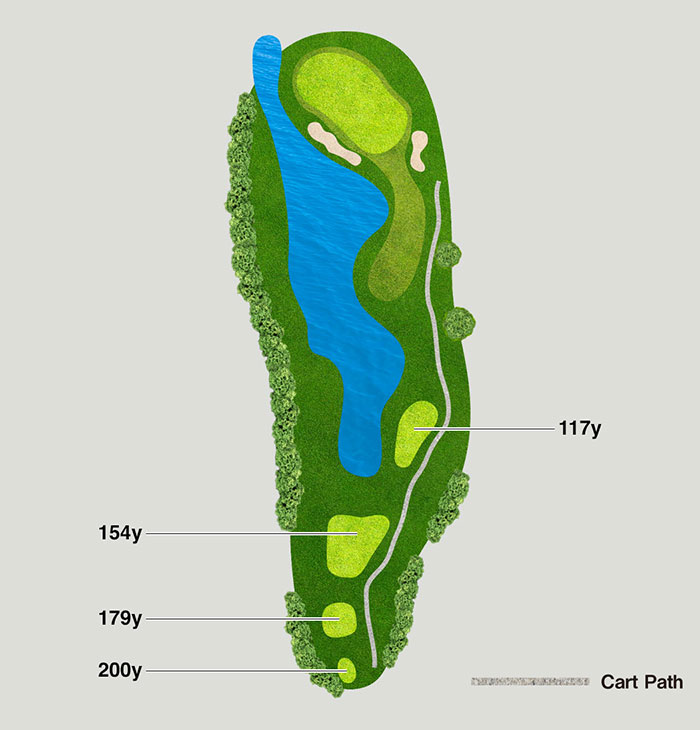
A picturesque short hole played over water. A waterfall along the left creates a striking backdrop. Avoid the pond and front bunkers, and take a slightly longer club to ensure a confident carry onto the green.
-
HOLE 18PAR 4
- BLUE
- 380y
- WHITE
- 365y
- GREEN
- 335y
- RED
- 271y
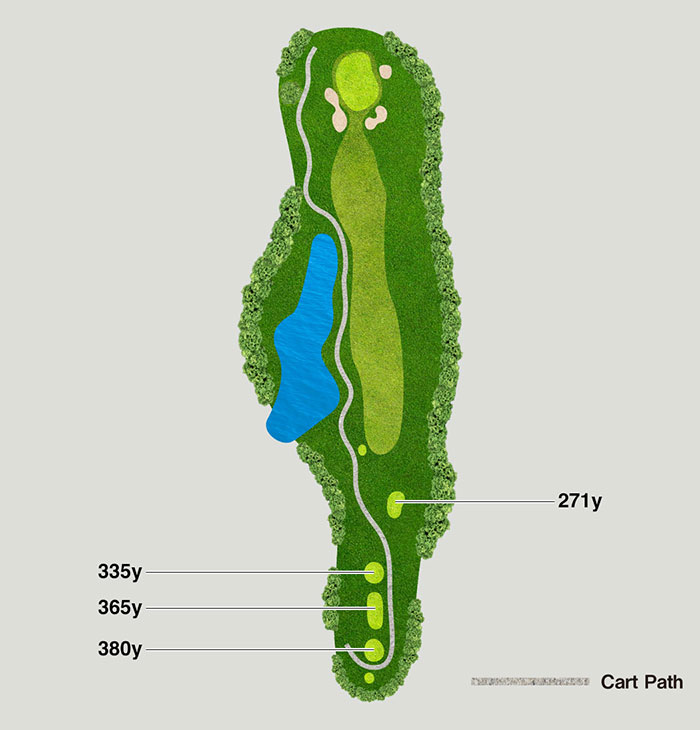
A flat finishing middle hole. A pond runs along the left side, so play a cautious tee shot. The ground falls away to the right near the green, making a safer approach from the left the preferred line.
Yardage
*The yardage is measured to the center of the green for short holes and to the edge of the green for middle and long holes.
| HOLE | PAR | YARDAGE | HDCP | |||
|---|---|---|---|---|---|---|
| BLUE | WHITE | GREEN | RED | |||
| 1 | 4 | 418 | 387 | 367 | 346 | 9 |
| 2 | 5 | 593 | 583 | 526 | 437 | 3 |
| 3 | 3 | 190 | 162 | 157 | 126 | 15 |
| 4 | 4 | 437 | 407 | 379 | 342 | 1 |
| 5 | 4 | 361 | 343 | 317 | 287 | 13 |
| 6 | 5 | 497 | 476 | 454 | 431 | 7 |
| 7 | 4 | 355 | 331 | 309 | 264 | 11 |
| 8 | 3 | 140 | 120 | 115 | 102 | 17 |
| 9 | 4 | 443 | 416 | 394 | 376 | 5 |
| OUT | 36 | 3434 | 3225 | 3018 | 2711 | |
| HOLE | PAR | YARDAGE | HDCP | |||
|---|---|---|---|---|---|---|
| BLUE | WHITE | GREEN | RED | |||
| 10 | 4 | 352 | 336 | 273 | 253 | 10 |
| 11 | 5 | 520 | 495 | 472 | 429 | 4 |
| 12 | 3 | 178 | 146 | 122 | 101 | 16 |
| 13 | 4 | 368 | 287 | 263 | 245 | 14 |
| 14 | 5 | 510 | 492 | 472 | 430 | 2 |
| 15 | 4 | 425 | 396 | 380 | 302 | 8 |
| 16 | 4 | 360 | 324 | 301 | 256 | 18 |
| 17 | 3 | 200 | 179 | 154 | 117 | 12 |
| 18 | 4 | 380 | 365 | 335 | 271 | 6 |
| IN | 36 | 3293 | 3020 | 2772 | 2404 | |
| BLUE | WHITE | GREEN | RED | |
|---|---|---|---|---|
| TOTAL | 6727 | 6245 | 5790 | 5115 |